How to (re)move Windows 11's supposedly 'unmovable' files in order to shrink its disk partition
It took a while until annoyance (and ethics?) overcame my laziness, but I finally got to the point of wanting to convert my latest Windows computer into a Linux computer, or rather, given I do have a couple of Windows only programs, into a dual-boot hybrid.
The final straw was when it became apparent that I’ve lost some unspecified number of files from years ago due to some mish-mash destruction that Windows 11s' Onedrive integration seems to have caused. I can see them, but they won’t open. Even after hours with Microsoft support staff. Oh, and why doesn’t my wifi auto connect any more? And why don’t my headphones work when I have a webcam plugged in? Anyway, those are all rants for another day.
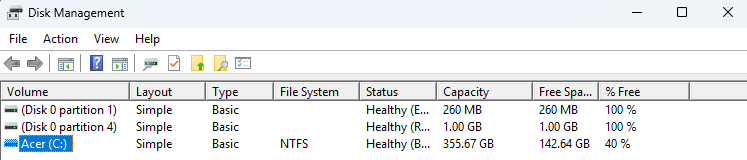
Anyway, the first step towards dual-booting is to reduce the size of the partition of hard drive space one uses for Windows and create a new blank one ready for Linux to use. This involves shrinking your Windows partition. Which should be easy now that Windows comes with a “Disk Management” program where you can right-click shrink.
Naturally, it was not easy.
I wanted to free up a partition of at least 100gb on my solitary hard disk, which seemed fair given I had free space of more like 250gb. However Disk Management wouldn’t let me choose to shrink Windows by more than 15gb due to unspecified “immovable files”. Linux, being space-efficient, can usually run in 15gb, sure - but no way do I want to limit myself like that. Plus my computer is my computer and I should be allowed to decide how I want it arranging! Including what files are on it and where.
Cue much web-searching, and a little AIing. There is no way I can consolidate the whole experience or all my notes here, but for the sake of posterity/future me, what ended up working best was to:
-
Load up the built-in Windows Disk Management app, right click the C: drive (my hard disk) and choose “Shrink volume”. It would spin for a while and then tell me I could shrink some paltry amount of space far lower than I wanted to. Then:
-
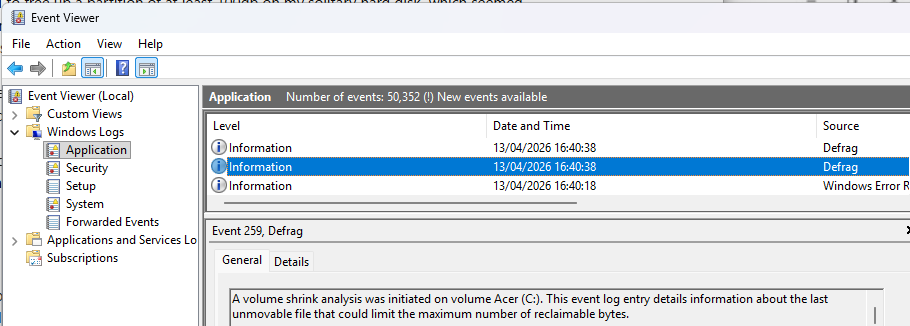
Load up the built in Windows Event Viewer and click on Windows Logs. Double-click the Application category you’ll see a massive list of events including some recent ones with a source labelled “defrag”. Clicking on one of the more recent ones of them will tell you the file that’s immovable, or at least one of them. For example:
A volume shrink analysis was initiated on volume Acer (C:). This event log entry details information about the last unmovable file that could limit the maximum number of reclaimable bytes. Diagnostic details:
- The last unmovable file appears to be: $Extend$Deleted\00000000000000::$DATA
Next, websearch / AI search to decode what that unmovable file actually is and how to remove it and get rid of it.
Here’s what Event Viewer looks like when you do the above:
Then go back and repeat 1 and 2 as often as necessary until disk management reports at least as much space as you want, at which point “Shrink volume” should work fine. This is quite boring but it took me a mere five iterations to get there.
One alternative to all this would be to use a third party program of which there are several probably very nice ones - but I didn’t feel like learning / risking that given the temperamentality of Windows I was working with an encrypted drive and so on.
Below are the “last unmovable files” I encountered and how to solve. Note that much of this involves deleting files I had rather little clue about what exactly were. I managed to re-assure myself that I didn’t need them, for for the sake of all things holy, please be confident you don’t need them and it won’t break your computer before doing likewise.
File: \System Volume Information{…}::$DATA
These are shadow copies of your data that Windows and other backup tools create for various reasons including to support the “system protection” feature that allows you to roll back to earlier versions of files or system restore points. Note that what I am going to decsribe will remove all of those so you won’t be able to revert to earlier points in time. Make sure this isn’t going to cause a problem for you! This in itself might be a deal-killer for you. But otherwise:
First Disable System Protection - which you can get to via Start -> Create a restore point -> select your hard drive -> Configure -> Disable
Remember to turn this back on once you are done!
To delete old shadow volumes, in terminal you can type e.g.
vssadmin delete shadows /all /quiet
For me this wasn’t enough. That’s because I was running third party backup software that creates shadow volumes and the above wouldn’t touch them. To get those to be deleted was surprisingly hard.
In the end the workaround for that was to tell Windows that all Shadow Files must be restricted to no more than a relatively small amount of data, e.g.
vssadmin resize shadowstorage /MaxSize=320MB
Anyway, reducing it to 320MB caused even my third-party big backup shadows to be deleted. Again, you want to undo this command when you’re doing, setting it to a big number or UNBOUNDED.
If you’re not sure what to reset it to then BEFORE you do the above you can run the below, which will also list any shadow volumes you have. You want to have none on your relevant hard drive by the time you’re done.
vssadmin list shadowstorage
to see what it is pre-changes.
File: $Extend$Deleted...::$DATA
These represented a deleted file. To solve I first emptied my Recycle Bin, and then in terminal ran:
chkdsk C: /f
and rebooted at least once in order to ensure everything was flushed out and any disk errors detected. I’m not sure if this step was truly necessary though.
File: \Windows\Logs\NetSetup\service.0.etl::$DATA
This is some log file or other that Windows network service had locked open. To dispose of this I stopped the relevant service:
net stop NetSetupSvc
and force-deleted the log file.
del /f /q C:\Windows\Logs\NetSetup\service.0.etl
Of course this means you lose the historic log data.
File: \pagefile.sys::$DATA
This is your virtual memory which your computer uses once it’s runs out of RAM.
Firstly I disabled virtual memory entirely by turning off the paging file which you can find under Start -> View Advanced System Settings ->Advanced tab -> Settings button under the Performance section -> Advanced tab -> Change button under Virtual Memory section -> Unlick automatically manage and choose “No paging file” and ignore all the scary warnings.
Then you have to reboot and that file should be gone. This is another setting you should absolutely remember to undo all the changes once you’re done shrinking your partition otherwise stuff might get very flaky and crashy.
File $Extend$UsnJrnl:$J:$DATA
This is Windows log of any changes to files on your system. It’s used by services like Windows search I think. In any case, I deleted it with fsutil like this
fsutil usn deletejournal /D C:
Doing all the above finally meant when I ran disk management it let me shrink the Windows partition enough to create a nice big blank space for Linux. I did that, and then re-went through the above undoing the change 1 and 4.
Note that if you reboot some of the journals etc. will automatically start to be re-created, so don’t do that before sorting out your partition except where noted above. And also you might need to be in administration mode when you type in many of the above commands (Start -> Terminal -> right click the icon -> Run as administrator)
And once again - be absolutely sure you don’t care about the manifold side effects of all these changes and deletions before doing them! They might be dangerous! Sure, they worked for me and I didn’t mind the side effects, but who knows what kind of state anyone else’s Windows computer is in.